“`html
What Causes Orange Peel in Polyurethane
I’ve stripped more orange peel finishes than I care to admit — and I’m talking the kind where you pull a piece out of the spray booth only to see that bumpy, dimpled surface staring back at you. That frustration compounds when you realize it’s not dust nibs or brush marks, but an actual finish defect baked into the cure.
Orange peel happens for specific reasons. Understanding them separates people who repeat the mistake from those who never see it again.
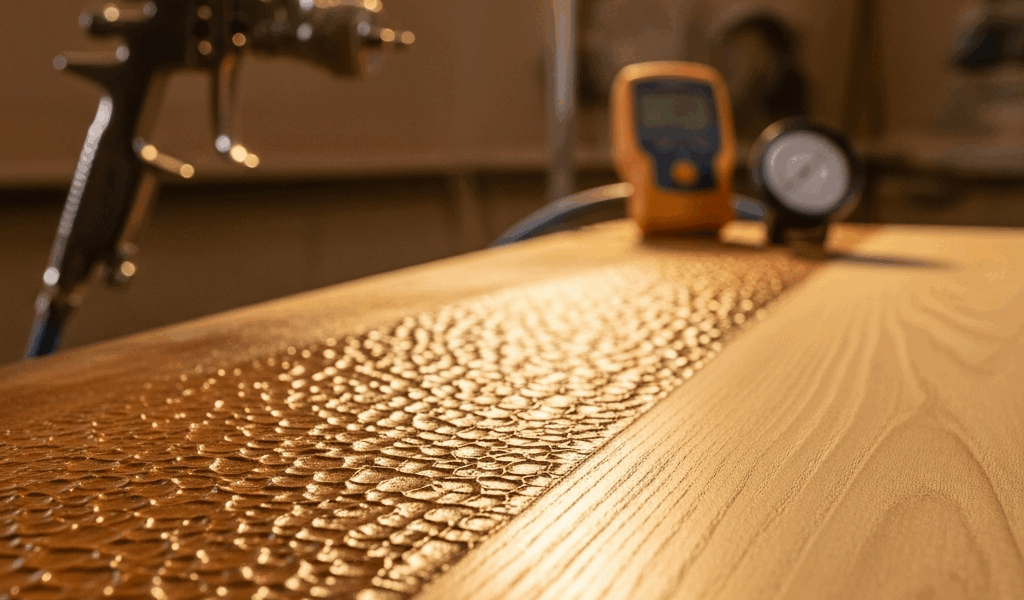
Solvent evaporation speed is the primary culprit. Polyurethane finishes require a delicate balance — solvents need to evaporate quickly enough that the material levels itself, but slowly enough that the solids can flow together smoothly. When solvents evaporate too fast, usually from low humidity, high temperature, or volatile solvent chemistry, the surface begins setting before leveling occurs. You end up with microscopic ripples that mimic orange peel texture.
Viscosity problems rank second. Too-thick polyurethane resists flowing. The spray gun atomizes it into larger droplets instead of fine mist, and these droplets don’t merge seamlessly — they sit on the surface like tiny spheres before solvent loss freezes them in place. Most people inherit this problem from inadequate thinning or using the wrong reducer altogether. I learned this the expensive way, using a fast reducer in summer conditions when a slow one would have saved me hours of sanding.
Spray technique causes orange peel more often than people acknowledge. Holding the gun too far away (beyond 12 inches typically) means the material dries mid-air before hitting the surface. Pressure that’s too high atomizes the finish into powder rather than liquid droplets. Overlapping patterns that are insufficient or inconsistent create areas where coating thickness varies wildly, and thinner sections cure differently than thicker ones.
Environmental extremes accelerate the problem. Temperature below 65°F slows cure dramatically, extending the leveling window but also creating condensation risks. Above 85°F, solvents evaporate so rapidly that the film can’t flow. Humidity below 30% or above 85% prevents proper solvent release from the coating. High humidity is particularly treacherous because moisture gets trapped in the film, creating small craters as it escapes during cure.
Applying too thin a coat is the sneaky culprit nobody mentions. With polyurethane, thinner isn’t always better. Coats under 2 mils dry so quickly that leveling never happens. They cure in the atomized state, locking in texture.
But what makes orange peel different? In essence, it’s a finish defect rather than contamination. It’s not dust nibs or sags. That matters for how you fix it.
How to Spot Orange Peel Before It Dries
Caught early, orange peel is often fixable without aggressive intervention. That’s what makes catching it in the moment so critical.
Use raking light. A single work light at a shallow angle across the surface reveals orange peel immediately — straight overhead lighting masks it entirely. Angle a halogen or LED light at 15 to 20 degrees across the wet finish. The shadows created by surface texture become obvious within seconds of application.
The window for intervention is typically 10 to 15 minutes after application, depending on temperature and humidity. Within this window, solvent is still mobile. The surface hasn’t hardened enough to be untouchable, but it’s set enough that you won’t cause runs.
If you spot orange peel while the finish is still wet, you have two options. First: lay another coat immediately. A fresh coat of properly thinned polyurethane will often flow over light orange peel, leveling the surface as new solvents mobilize the underlying layer. This works maybe 70% of the time if the first coat was thin and the orange peel is mild.
Second option: stop and adjust. Let the coat harden completely, usually 4 to 8 hours depending on temperature, then diagnose what went wrong. Plan your next application differently. Rushing a second coat when you haven’t identified the cause just repeats the mistake.
Once the finish is fully hard, you’re beyond the window. Orange peel baked into a cured coat requires either re-coating with a leveling agent or mechanical correction.
Fixing Orange Peel Without Sanding It Off
Probably should have opened with this section, honestly, since everyone wants to avoid extra work.
If orange peel is mild and only one coat is affected, a properly formulated re-coat can work. The theory is sound: fresh polyurethane with the right solvent composition will soften the previous layer slightly, allowing it to flow into the valleys while the new coat levels itself.
The requirement is precision thinning. Use a slow evaporating reducer — typically labeled for high-temperature or humid conditions, even if your shop conditions were normal. This extended open time lets gravity and solvent action flatten the surface. Thin the polyurethane to 16-18 seconds in a #4 Ford cup, versus standard 14-16 seconds. Thinner material flows more readily.
Apply in light passes rather than trying to hide the orange peel in one coat. Multiple thin coats perform better than one thick one. Gun distance of 8 to 10 inches, low pressure — 25-30 PSI at the cap — and generous overlapping all encourage flow.
This approach succeeds when orange peel is surface-level and the underlying finish is still partially solvent-rich. It fails when the orange peel is deep, the underlying coat is fully cured, or you’re dealing with multiple layers of orange peel texture building on themselves.
I’ve also had luck with flow-out additives specifically designed for polyurethane. Products like Kremlin Microstar or equivalent additives reduce surface tension, helping the finish level more aggressively. Add these at 1-2% by volume, no more. Too much interferes with cure and adhesion.
The honest truth: this method works maybe half the time. If it doesn’t, you haven’t wasted more than a gallon of material. But if you’re dealing with orange peel across multiple coats, or if it’s deep enough that you can feel it when you run your hand across the surface, sanding is coming.
The Sanding and Recoat Method
Sometimes you sand. Accept this and do it right.
Start with 180-grit paper if orange peel is light. Use 120-grit if it’s moderate or involves multiple layers. Avoid 80-grit unless you’ve got deep texture — you’ll sand through the finish into bare wood faster than you expect.
Sanding technique matters as much as grit. Sand with the grain whenever possible. Use long, consistent strokes. Pressure should be light and even, just enough to cut the texture without aggressive removal. This isn’t the time to fight. Rushed sanding creates flat spots and gouges.
Dust removal is non-negotiable. Vacuum thoroughly, then tack-cloth the entire surface. Polyurethane won’t flow over trapped dust — you’ll embed it and create a new set of problems. Let dust settle completely before tack-clothing. This takes 15 minutes minimum, longer in larger rooms.
After sanding, let the bare wood breathe for at least 24 hours before recoating. Polyurethane doesn’t stick well to freshly sanded surfaces that have absorbed moisture. This delay allows equilibration.
Your next coat must be applied with the lessons learned. If spray technique was the problem, adjust gun distance, pressure, and overlap pattern. If environmental factors were the issue, delay spraying until conditions improve. If thinning was inadequate, measure your reducer more carefully using the Ford cup method. Don’t repeat.
Apply in thinner, more numerous coats rather than one thick one. Two 2-mil coats outperform one 4-mil coat for leveling and durability.
How to Prevent Orange Peel on Your Next Project
Prevention is where expertise actually lives. Anyone can sand and re-spray. Preventing orange peel means controlling variables.
Spray distance should be 8 to 10 inches for most polyurethane systems. Measure it. Hold a ruler perpendicular to the gun nozzle, spray a test pass, and count the strokes. 10 inches feels farther away than it is in practice. Too close causes runs; too far causes orange peel.
Pressure settings depend on your equipment. Standard HVLP guns perform best at 25-35 PSI at the cap. Conventional guns work at 40-50 PSI. Check your gun’s specifications. Higher pressure doesn’t improve coverage — it degrades atomization and wastes material.
Overlap percentage should be 50%. Each pass covers the previous one halfway. This ensures consistent film thickness and allows solvents to escape uniformly. Insufficient overlap creates dry spots; excessive overlap pools material.
Thinning ratios are not suggestions — use a #4 Ford viscosity cup. Standard polyurethane targets 14-16 seconds. In warm or low-humidity conditions, extend this to 18-20 seconds using a slow reducer. In cool or humid conditions, stay closer to 14-16 seconds with a medium reducer. This small adjustment prevents orange peel more reliably than any other single measure.
Temperature and humidity windows are real. Spray between 65°F and 85°F, with humidity between 40% and 70%. Outside these ranges, you’re fighting physics. A dehumidifier costs $150 and saves gallon quantities of ruined finish. Space heaters are similarly cheap insurance. Plan your spraying around weather, not around your schedule.
Drying time between coats matters. Most polyurethane systems need 4-8 hours minimum, depending on thickness and conditions. Don’t assume 4 hours is always safe. Thicker coats need longer. Cool temperatures extend times dramatically. Check your product’s technical data sheet, then add 25% to the time listed. You’re not rushed. Waiting prevents orange peel far more effectively than any sanding session.
One final detail: reduce material temperature to room temperature before spraying. Cold polyurethane from an unheated storage area sprays differently than room-temperature material. High viscosity and poor atomization result. Let material acclimate for 2-4 hours.
Orange peel is preventable. Most people learn this after fixing it three times.
“`


Stay in the loop
Get the latest fine finish wood working updates delivered to your inbox.