“`html
How to Sand Wood Stain Off Without Damaging Bare Wood
I’ve been refinishing furniture for about eight years now, and I can tell you with absolute certainty that discovering you’ve applied the wrong stain color after it’s dried is a special kind of panic. The question that immediately follows is always the same: can I sand this off without ruining the wood underneath? The answer is yes—but only if you know exactly what you’re doing.
Removing wood stain through sanding is absolutely possible. It’s aggressive, it requires patience, and it demands respect for the wood itself. But it works. The trick isn’t just knowing whether to sand; it’s understanding when sanding is your best option versus when you should reach for chemical strippers instead. Then comes the technical part—the grit selection, the pressure, the grain direction, all of it designed to preserve the wood substrate while actually lifting that stain.
So, without further ado, let me walk you through the entire process from decision-making to final preparation.
When Sanding Stain Off Is the Right Move vs. Chemical Stripping
Not every stain removal situation calls for sandpaper. This is probably the most important distinction I can make upfront, and honestly, I should have led with this years ago.
Sanding works best when three conditions are met: you’re dealing with a hardwood species like oak, maple, or walnut; the stain layer is relatively thin (one or two coats); and the wood surface itself is in decent condition without veneers or delicate inlays. If you’ve got red oak with a single coat of Minwax Dark Walnut that went too dark? Sand it off. If you’ve got pine that’s been stained twice and you’re worried about grain damage? Maybe don’t.
Chemical strippers—products like Citristrip or methylene chloride-based formulas—are safer for veneer work, exotic woods, or pieces with intricate details. They dissolve the stain rather than abrading it away. The downside is they’re slower, messier, and cost more. They also require proper ventilation and safety equipment you probably don’t have lying around.
Here’s the decision framework I use: If the wood is soft or veneered, go chemical. If the stain is thick or multiple coats, go chemical. If you’re on a hardwood with light to moderate stain, sanding is faster and cheaper. If you’re uncertain about the wood type or finish history, start with a small chemical test in an inconspicuous spot first.
The wood type matters enormously. Hardwoods like maple or oak have tight grain structures that sand predictably. Softwoods like pine or spruce have open grain that splinters and shows sanding damage instantly — especially if you’re not careful. Exotics like teak or rosewood have inconsistent density that can crater under aggressive sanding.
Choosing Your Starting Grit Without Over-Sanding
Grit selection is where most people fail. They either start too coarse and gouge the wood, or they start too fine and never actually remove the stain. This is the moment where you need a clear reference point.
For thick stain layers—multiple coats or stain that’s been sealed—start with 80-grit sandpaper. For moderate stain, one solid coat that’s clearly visible, use 120-grit. For light stain or surface discoloration, 150-grit is your baseline. Write this down if you need to. These three numbers will handle 95 percent of your stain removal situations.
The reason grit matters so much is that you’re not just removing stain; you’re removing wood. A single pass with 80-grit removes roughly 0.001 inches of material. That sounds tiny until you realize it’s enough to expose the wood grain underneath, creating visible scratches if you’re not careful. Jumping directly from 80 to 220 grit—which many people try to do—leaves scratches that stain will highlight later. It’s a disaster waiting to happen.
I made this mistake on a walnut dresser five years ago. Went from 80 straight to 150, didn’t fill the scratches, restained, and the new stain pooled in those micro-valleys like little rivers. The piece looked like it had a disease. Now I always progress: 80, then 120, then 150, then final prep with 180 if needed.
Always check the wood species and the stain type before choosing your starting grit. Penetrating stains soak into the wood fiber and require more aggressive starting grits. Surface stains sit on top and come off faster. If you’re unsure what you’re dealing with, test on a corner or hidden edge first — at least if you want to avoid surprises.
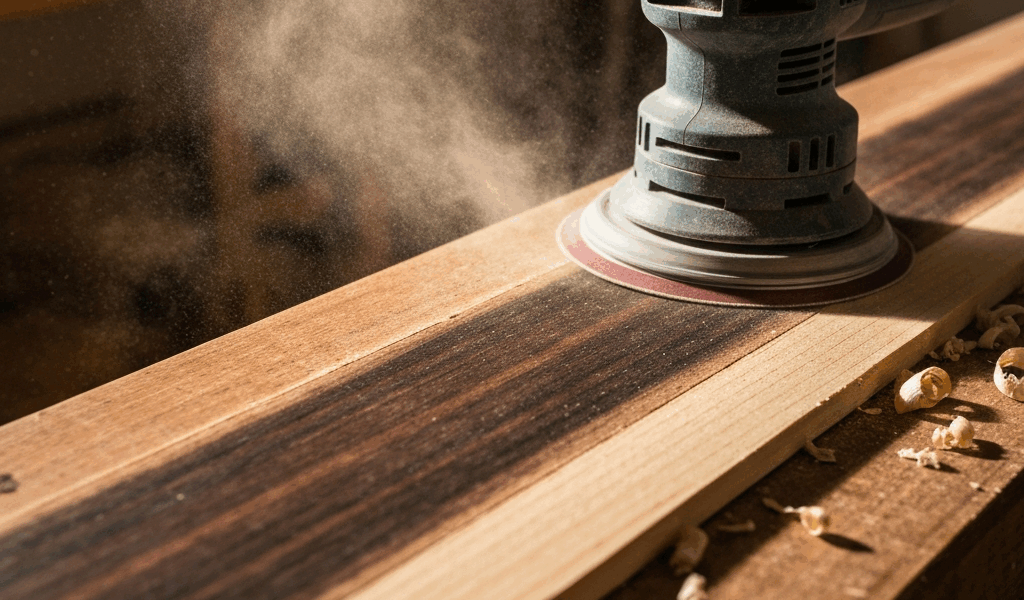
Step-by-Step Sanding Technique to Remove Stain Safely
The actual sanding process separates people who get beautiful results from people who end up with divots and grain exposure.
Start by securing your piece. Clamps, sawhorses, a sturdy workbench—whatever keeps it stable. Movement during sanding creates inconsistent pressure and uneven removal. I use two sawhorses and a piece of plywood for tabletops because it distributes pressure evenly across the surface.
Sand with the grain. Always. This is non-negotiable. Sanding against the grain is how you get tearout and splinters that no amount of stain will hide. To find the grain direction, look at the edge of the wood or run your hand along the surface—grain direction feels smoother one way than the other. That smoother direction is “with the grain.” Sand along it exclusively.
Pressure is where technique becomes critical. You need enough pressure to cut the stain but not so much that you’re aggressively abrading the surface. The pressure should feel almost passive — let the sandpaper do the work, not your arm. I describe it to people as “hand weight only.” Your palm rests on the sanding block, and gravity provides the pressure. If you’re leaning into it, you’re too aggressive.
Use a sanding block, not your bare hand. A sanding block—you can make one from scrap wood—distributes pressure evenly and prevents the rounded fingertip pressure that creates dips. I use a 4×7 block for most work, wrapped with your chosen grit sandpaper.
Make full, deliberate passes along the grain direction. One pass, then check. Don’t do multiple passes on the same spot hoping to speed up the process. That’s how you crater the surface. Each stroke should be smooth and unhurried—maybe 12 inches long, parallel to the grain, with slight overlap from one pass to the next.
Dust collection is underrated in this process. Use a random orbital sander with dust collection, or manually sand with a vacuum nearby. The dust prevents you from seeing what’s happening, and it clogs the sandpaper, forcing you to push harder. That harder pressure is the enemy of good results.
Check your work every three to five passes. Wipe away the dust with a damp cloth and look at the surface. You should see stain disappearing gradually, evenly, not in patches. If one area is coming off faster than another, you’re applying uneven pressure. Adjust and continue.
Spot-Check Your Progress Without Sanding Through
This section is the difference between a successful stain removal and a wood disaster.
Stop sanding periodically—I do this every five minutes or so—and wipe the surface with a barely damp cloth. Not soaking wet, just damp enough to reveal the true surface color without dust interference. Let it dry for 30 seconds. This shows you exactly how much stain remains without committing to additional sanding passes you might regret.
What you’re looking for: uniform color lightening across the entire surface. What you’re worried about: visible sanding scratches, exposed grain that looks white or pale, or divots where the sanding block sat too long.
If you see fine scratches that are barely visible, keep going. If you see deep scratches or whitish grain exposure, you’ve gone too far. At that point, stop sanding with your current grit and move to the next grit up—120 to 150, for example—to blend those scratches out. But honestly, it’s better to stop before you reach that point.
On a tabletop I worked on last year—a mahogany piece with three coats of stain—I found that the stain came off completely around 40 passes of 120-grit. I checked progress at 20 passes, and at 35, and at the final 40. By checking frequently, I never went too far. If I’d just powered through with my eyes closed, I would have easily done 60 passes and sanded into the grain.
Corners and edges require special attention. The edges of a tabletop, the corners of a frame—these areas are where the wood is thinnest and sanding damage is most visible. Use slightly lighter pressure here, and consider skipping these areas during aggressive sanding, then addressing them with a finer grit at the end. Or use a small detail sander and work very carefully.
Finishing After Stain Removal Sanding
Once the stain is off, you’re not done sanding. You need to progress through finer grits to erase the scratches left by your initial passes.
After you’ve removed the stain with your starting grit, move up one grit level. If you started with 120, go to 150. If you started with 80, move to 120. Make fewer passes here—maybe 15 to 20—just enough to blend the scratches from the previous grit. This creates a surface that’s ready for new stain or topcoat without visible imperfections.
Before applying new stain, raise the grain. Sand the wood lightly with 180-grit, wipe with a damp cloth, let it dry completely, then sand again lightly. This removes the wood fibers that would otherwise stand up when wet stain is applied, creating a bumpy texture you’ll absolutely hate. It’s an extra step that most people skip and then regret later.
Your bare wood is now ready. The stain is gone, the surface is smooth, and the grain structure is intact. Whether you’re applying new stain or a clear topcoat, you’ve preserved the wood substrate while achieving complete stain removal. That’s the whole goal.
“`


Stay in the loop
Get the latest fine finish wood working updates delivered to your inbox.