How to Fix a Cloudy Polyurethane Finish on Wood
Polyurethane finishes have become harder to navigate with all the conflicting advice flying around. As someone who’s ruined more than one project chasing bad fixes, I worked through the fundamentals of cloudy poly the hard way — standing over a dining table I’d spent three weekends building, watching a milky white haze creep across what was supposed to be a clean satin topcoat. Took me an entire extra week to sort it out. The thing is, cloudiness isn’t one problem. It’s four different problems wearing the same mask, and treating them identically is how you waste time, materials, and what’s left of your patience.
Why Poly Goes Cloudy — 4 Different Causes
Before you grab sandpaper and start attacking the surface, you need to know what you’re actually dealing with. Four main culprits. They don’t all look exactly alike under a good raking light — and that difference matters.
Moisture Trapped During Application
This is the big one. Humidity is the enemy of a clear finish — full stop. Apply polyurethane when relative humidity is above 70%, or over wood that’s been sitting in a damp space, and water vapor gets sealed under the film. Nowhere to go. The finish cures around it and produces that unmistakable milky white look, almost like someone frosted the surface from underneath. Oil-based poly gets hit harder than water-based, but neither is immune. I’ve seen it happen in both.
Applied Too Thick
Every brand has a recommended spread rate. Minwax Helmsman, for example, suggests 125 square feet per quart per coat. Go heavier than that — especially trying to knock out a project in one thick pass — and the surface skins over before the solvents underneath can escape. You end up with a foggy, lifeless look that’s duller than it should be. Sometimes fine wrinkles appear too, if it was really over-applied. That’s what makes this one frustrating to us woodworkers — it looks like you did everything right, just slightly too enthusiastically.
Contaminated Brush or Surface
Silicone from furniture polish. Oil from your hands. Wax residue from a previous finish sitting in the grain. Any of these on the wood surface — or in your brush before you start — creates adhesion problems and surface irregularities that read as cloudiness. This version tends to show up as a slightly bumpy, irregular haze rather than a smooth milky film. It looks wrong in a different way than moisture does, once you know what to look for.
Temperature Too Low
Oil-based polyurethane wants to be applied and cured above 50°F — honestly, above 65°F if you want clean results. Cold garages in late fall are notorious for this. The finish doesn’t flow right, dries unevenly, and leaves a dull, almost frosty-looking surface that no amount of additional coats will rescue. I made this exact mistake one November, applying General Finishes Arm-R-Seal in my unheated shop at around 48°F. Didn’t realize it until the next morning. Steer clear of where I went wrong.
Diagnosis — Which Type of Cloudy Are You Looking At?
Quick note before the rest of this. Before you touch anything, look at the surface in raking light — a single LED work light held low and at an angle is ideal for this. What you see will tell you almost everything.
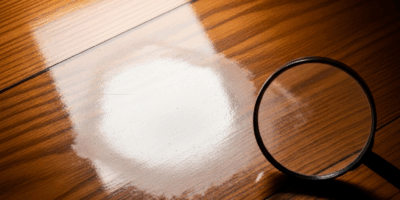
Milky White, Even Across the Surface
Consistent milky discoloration that looks almost like frost sitting under the film — that’s moisture. It tends to be uniform rather than patchy. Hold your hand over the surface. If the wood feels slightly cool or the shop has been running humid, that confirms it.
Dull Haze with No Real Depth
Flat and lifeless, but not white — more like a fogged-up window than a milky one. That’s almost certainly a thick application issue. The finish built up too fast and the solvents couldn’t breathe their way out. Check your coverage: if you applied less than 100 square feet per quart, you went too thick.
Bumpy, Irregular, or Fisheye-Style Haze
This reads differently from the others. Instead of a smooth cloudy film, you’ll see small craters, bumps, or uneven patches where the poly pulled away from itself. That’s contamination — silicone is the most common culprit, apparently. Think back to what was on the wood before you started and what was in your brush.
Overall Dullness with Poor Flow Lines
Brush marks more visible than they should be, an almost frosty look with no shine even after full cure time — that’s temperature. If your shop dropped below 55°F during application or curing, you’ve found your answer.
Fix for Moisture Cloudiness
Good news: moisture cloudiness, caught early, is fixable without stripping. You just need to actually control your environment before you recoat — skipping that step is how people end up with the same problem twice.
Light Sanding and a Dry Recoat
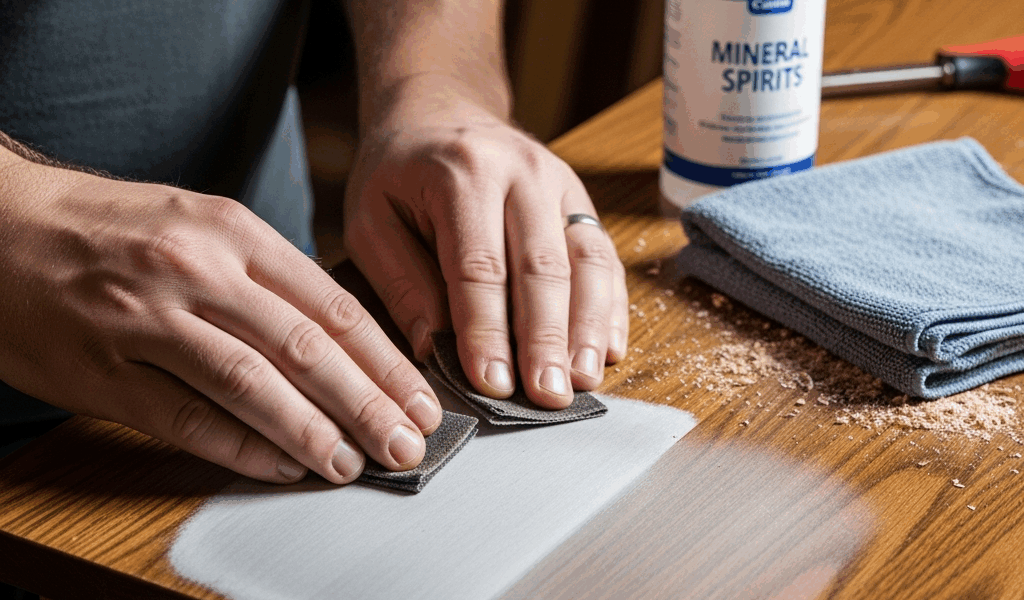
Start with 400-grit sandpaper — I use 3M Wetordry sheets, about $8 for a pack of five at any hardware store. Sand the entire cloudy surface lightly, just enough to dull the finish and open it up slightly. You’re not trying to cut through to bare wood. Wipe off all dust with a tack cloth, then let the surface sit in a dry space for several hours. Get relative humidity below 50% if you can. A $40 Eva-Dry dehumidifier unit works fine for a small shop — that’s what I run in mine.
Apply the next coat thin. For oil-based poly, thin it roughly 10% with mineral spirits. For water-based, use it straight from the can without loading your brush heavily. Long, even strokes. Don’t go back over areas that have started to tack up — that’s how you introduce new problems.
Heat Gun for Small Spots
Frustrated by a single cloudy patch in the middle of an otherwise clean finish, a woodworker I know started using a heat gun on low — around 200°F, never higher — to drive out trapped moisture before recoating small areas. Hold it 8 to 10 inches above the surface, keep it moving constantly, work in a 6-inch circular pattern. This doesn’t scale well to large areas, but for a 4-inch cloudy spot it can save you a full sand-and-recoat cycle. Test on something inconspicuous first.
Fix for Thick Application Haze
This one requires more work. You can’t recoat over a foggy thick layer and expect it to clear up — the problem lives underneath the surface, and a fresh coat just adds to the pile.
Sanding Back to the Clear Layer
Sand back until you reach the layer that’s actually clear. Start with 220-grit to cut through the haze faster, then finish with 320 or 400. You’ll know you’ve reached good material when the sanded surface looks uniform and slightly chalky white — not patchy, not milky, just even. Wipe clean, tack cloth the surface, let it sit for 30 minutes before touching it again.
Reapply with Thinned Coats
Mix one part mineral spirits to nine parts oil-based poly — roughly 1.5 oz of mineral spirits per 13.5 oz of finish if you’re working from a quart. This thins the film so it flows better and solvents escape cleanly. Apply three thin coats instead of trying to rebuild it in one pass, sanding lightly with 400-grit between each. Allow full dry time between coats — at least 24 hours under normal conditions, 48 hours if your shop runs cool.
Multiple thin coats always beat one thick coat. Every single time. The finish looks better, cures harder, and you avoid this exact problem. That’s what makes the thin-coat approach so endearing to us finish woodworkers — it’s slower, but it actually works.
When to Strip and Start Over
Sometimes the cloudiness isn’t just sitting in the finish — it’s gone all the way down into the wood fibers. Press your fingernail gently into the edge of the cloudy area. If the finish is still a separate film you can feel lifting, you’re in repair territory. If it crumbles or the wood itself looks discolored underneath, you’re stripping. No way around it.
The Citristrip Method
Citristrip Stripping Gel — about $14 for a quart at Home Depot — is the least miserable way to strip polyurethane off wood. Apply a thick layer, don’t be stingy, and cover the piece with plastic wrap to keep the gel from drying out before it does its job. Let it sit at least 4 hours. Overnight is better if you’ve got multiple coats of poly built up. Scrape with a plastic paint scraper — not metal — to avoid gouging the grain. Work with it, not against it.
After scraping, scrub with a nylon brush and a rag dampened with mineral spirits to pull residue out of the grain. Then let the wood dry completely — at least 48 hours in a warm, dry space — before you even think about applying finish again. Rushing that step is how you end up back at square one.
How Long This Actually Takes
Plan for a full weekend minimum if you’re stripping. Application day one, dry time day two, light sanding and first recoat day three. Three thin coats with sanding between each puts you at four to five days total from strip to final coat. It’s annoying. It’s also the right way to do it.
The cloudiness might look like a minor cosmetic issue — just a little haze, no big deal. But patch it wrong and you’ll be back doing the whole thing a second time, which is genuinely more frustrating than just doing it properly the first time through. Slow down. It’s worth it.

Stay in the loop
Get the latest fine finish wood working updates delivered to your inbox.