
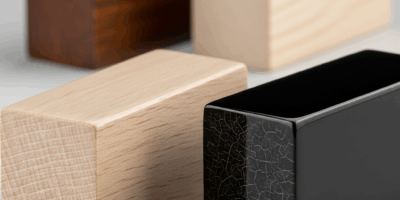
Best Circular Saw Blade for Clean Cuts — What Tooth Count Actually Means
Circular saw blades have gotten complicated with all the marketing noise flying around. As someone who spent fifteen years doing custom furniture and cabinet work, I learned everything there is to know about tooth count, finish quality, and what actually matters when you’re trying to get a clean edge. Today, I will share it all with you.
Don’t make my mistake. Early on, I grabbed whatever blade was already mounted on my old DeWalt — a 40-tooth general-purpose blade I’d apparently owned for two years — and ran it through everything. Crosscutting framing lumber? Same blade. Plywood cabinet sides? Same blade. Finish-cutting hardwood face frames? Still that same blade. The results were exactly what you’d expect: chipped veneer, fuzzy edges on maple, and hours of sanding work that never should have existed in the first place.
I was fixing the saw’s output instead of choosing the right tool. Big difference.
What Tooth Count Actually Does to Your Cut
But what is tooth count, really? In essence, it’s the number of carbide tips spaced around a blade’s circumference. But it’s much more than that — it’s the single biggest factor controlling how aggressively your blade bites into material and what the finished edge looks like afterward.
Take a 24-tooth blade on a 7.25-inch diameter. Enormous gaps between each tooth. Each one takes a massive bite per rotation. Fast. Aggressive. Rough edge. Now put an 80-tooth blade on that same saw — four times the teeth on the same circumference, each one taking a microscopic sliver of material. The edge comes out smooth because you’re essentially making dozens of tiny passes instead of a handful of brutal ones.
The trade-off is pure physics. More teeth means slower feed. Slower feed means the motor works harder. Push too hard and it bogs immediately — most people blame the blade when they’re really just fighting basic mechanics. I can feel the difference the instant the blade touches wood. A 24-tooth blade almost lunges forward. An 80-tooth wants patience. Feed it steady and gentle, or it lets you know.
Fewer teeth means speed and raw material removal. You’re cutting faster with less motor strain. But you’re leaving a surface that needs real cleanup — sanding, planning, something.
24T vs 40T vs 60T vs 80T — When to Use Each
24-Tooth Blades — Framing and Rough Cuts
I reach for my 24-tooth when I’m ripping dimensional lumber, breaking down rough stock, or making cuts where speed is the only thing that matters. You’ll see these on job sites everywhere. Fast, efficient, and honestly around $15 to $25 for a decent one — cheap enough that replacement never stings. The rough edge gets buried behind drywall anyway, so a 24T blade is completely logical for production work.
That’s what makes the 24-tooth endearing to us framing-day workers — it doesn’t pretend to be anything it isn’t.
40-Tooth Blades — The Jack of All Trades
The 40-tooth blade came standard on most of my saws for years. Fast enough for ripping. Smooth enough for crosscutting dimensional lumber. Not specialized, not bad at anything. Running about $30 to $50, it makes sense when you’re doing genuinely mixed work — framing, shelving, basic cabinetry. You’ll grab this when the day hasn’t decided what it wants from you yet.
Probably should have been clearer about this earlier: a 40T won’t give you finish-quality edges on hardwood. It’s a compromise blade. A good compromise — but still a compromise.
60-Tooth Blades — Where Finish Work Starts
This is where things get genuinely interesting. A 60-tooth blade cuts plywood crosscuts cleanly on both faces. Veneer stays intact. Veneered plywood looks intentional instead of damaged. There’s a visible, real difference in edge quality compared to a 40T — not subtle, not theoretical. You see it immediately.
The 60T is my reach-grab blade for most finish work that isn’t the centerpiece of a project. Cabinet sides. Shelving. Anything where the edge will be visible but not inspected up close. Expect to spend $40 to $70 for a quality 60-tooth blade. So, without further ado, let’s dive into where the 60T earns its keep: mixed material, moderate-inspection cabinetry where changing blades every ten minutes isn’t realistic.
80-Tooth Blades — Showcase Finish Cuts
Eighty teeth. Specialized territory. You’re feeding slower, deliberately, carefully. But the result — a glass-smooth edge on hardwood, pristine veneer on premium Baltic birch, virtually zero chipping on painted MDF — is worth every ounce of patience it demands.
I use my 80-tooth for face frames, visible edges on built-ins, any hardwood getting stained to show grain. The edge comes out so clean it sometimes doesn’t need sanding at all. I’ve applied finish directly to the cut edge on cherry and walnut — no intermediate steps. That’s the 80T doing exactly what it costs $60 to $100 to do.
You maintain this blade. You care for it. You don’t abuse it. It’s not disposable.
Best Blades for Finish Cuts
Freud Diablo D0760A — The Balanced Choice
The Freud Diablo D0760A might be the best option for most woodworkers, as finish cabinetry requires consistent edge quality across dozens of different materials. That is because its carbide teeth and aggressive hook angle handle plywood, softwood, and mixed materials without drama — and it stays sharp for longer than anything in the same price range. Running about $55.
I’m apparently a Freud guy, and the D0760A works for me while cheaper 60-tooth blades never quite deliver the same longevity. Thousands of linear feet through this blade. Earned its reputation honestly.
DeWalt DW3128 60T — The Workhorse Alternative
DeWalt’s 60-tooth runs closer to $40 and cuts similarly for general finish work. I’ve had mixed results with longevity — sharper than budget blades, not quite as durable as the Freud. That said, at $40, replacement doesn’t feel like a setback. This is the blade I throw in the truck when I genuinely don’t know what the day will require. Good enough for most cuts. Honest about what it is.
Makita A-90620 80T — The Finish Specialist
Frustrated by chipped edges on showcase hardwood, I finally committed to the Makita A-90620 — an 80-tooth carbide blade running around $75 — and the difference was immediate. Edge quality noticeably superior to any 60T alternative. This new standard in my shop took over for all visible hardwood work and eventually evolved into the go-to blade finish woodworkers know and trust for face frames and built-in cabinetry.
Requires careful feeding. Demands a saw with real power — don’t put this on an underpowered trim saw. Won’t tolerate abuse. But if the edge matters, this blade delivers.
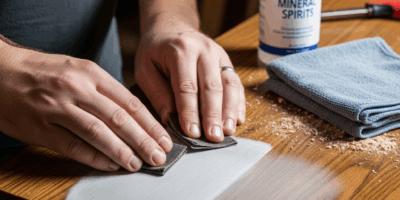
Blade Maintenance That Actually Matters
Cleaning Out Pitch Buildup
Probably should have opened with this section, honestly. Most people never clean their blades. An 80-tooth blade clogged with pitch and resin doesn’t cut like an 80-tooth blade — it cuts like something dull and twice as thick. You generate heat. You force the motor. You blame blade quality when the real problem is a ten-minute cleaning job you skipped for six months.
I spray my good blades with oven cleaner every few months, let it sit for five minutes, and wipe it off. Simple Green works too. WD-40 in a pinch. The blade cuts noticeably better afterward — not marginally, noticeably. It’s not optional maintenance. It’s the difference between a $75 blade performing as designed and one that’s quietly failing you on every cut.
Sharpening Versus Replacement
Professional sharpening costs $8 to $15 per blade depending on tooth count. When a $55 blade dulls, sharpening costs roughly a quarter of replacement. So sharpen it. Run the blade until cut quality drops visibly, then send it out to a sharpening service — most cities have one, or you mail it. Don’t replace blades that just need service.
The exception: while you won’t need to sharpen a $20 utility blade, you will need a handful of sharpenings on anything pushing $60 or more. Do the actual math for your specific blade before deciding. Standard utility blades under $40? Replacement is almost always cheaper than sharpening plus shipping costs.
Storage That Prevents Rust
First, you should hang blades individually where they won’t contact each other — at least if you want to stop replacing teeth you accidentally chipped during storage. I keep mine on a wall-mounted blade rack inside a cabinet. Prevents tooth chips. Prevents rust on the body. The rack cost me $18 at a woodworking store in 2019. It’s prevented probably $200 in blade damage since then.
The best circular saw blade for finish cuts comes down to matching tooth count to actual work. Understand what each count does mechanically. Maintain what you have. And you’ll stop chasing smoother edges — they’ll just show up on their own.


Stay in the loop
Get the latest fine finish wood working updates delivered to your inbox.