Why Brush Marks Happen in the First Place
Polyurethane finishing has shifted noticeably with all the conflicting advice flying around. And I say that as someone who has stood in front of a freshly coated tabletop at 2 AM, watching the finish dry under a single work light, convinced I’d nailed it — only to watch a perfectly smooth surface turn into a landscape of ridges. The panic is something else. So today, I will share everything I’ve learned about why this keeps happening and how to actually fix it.
But what is the real problem here? In essence, it’s that polyurethane doesn’t self-level the way lacquer does. But it’s much more than that — there are three specific mistakes that cause brush marks every single time, and most people only ever fix one of them.
First: speed. Room temperature climbs above 75°F or humidity drops, and the poly skins over in about 15 minutes flat. Your brush strokes freeze mid-flow. Second: brush drag. A cheap brush — stiff bristles, wrong type for oil-based — creates friction and leaves actual grooves in the wet finish. Third: thickness. More than 2–3 mils per coat (roughly the thickness of a credit card) means the finish dries before gravity can do its job. That’s it. Three things.
Diagnosing which one you got wrong matters. Did the room heat up between coats? Temperature. Does the surface feel like texture you could sand off, or did you load too much material? Two different problems. Two different fixes. Don’t skip this step.
How Bad Are the Marks — And Does That Change the Fix
This is the decision fork most articles skip entirely. It’s also why frustrated woodworkers end up sanding their finish down to nothing, chasing a problem they didn’t need to fully solve. Probably should have led with this, honestly.
Light texture is what you feel when you run your palm flat across the surface — but barely see. Tilt the piece under raking light (a cheap flashlight held at a sharp angle works fine) and the marks basically disappear. Cosmetic damage only. Two hours, you’re done.
Visible ridges catch light at certain angles. Think very shallow corduroy. You can see them under a bright overhead without any raking trick. Moderate problem. Plan for four to six hours, including dry time.
Deep troughs — the kind you can trace with your fingernail — mean the finish pooled in spots and dried thin in others. That’s the “did I ruin it?” moment. Honest answer: no. But you’re looking at a full sand and recoat. Maybe two. Clear your schedule.
Severity changes your starting grit and whether you need a full sand or just a scuff. Skip this and you’ll waste an hour on 320-grit when 220 was the right tool all along. Don’t do what I did.
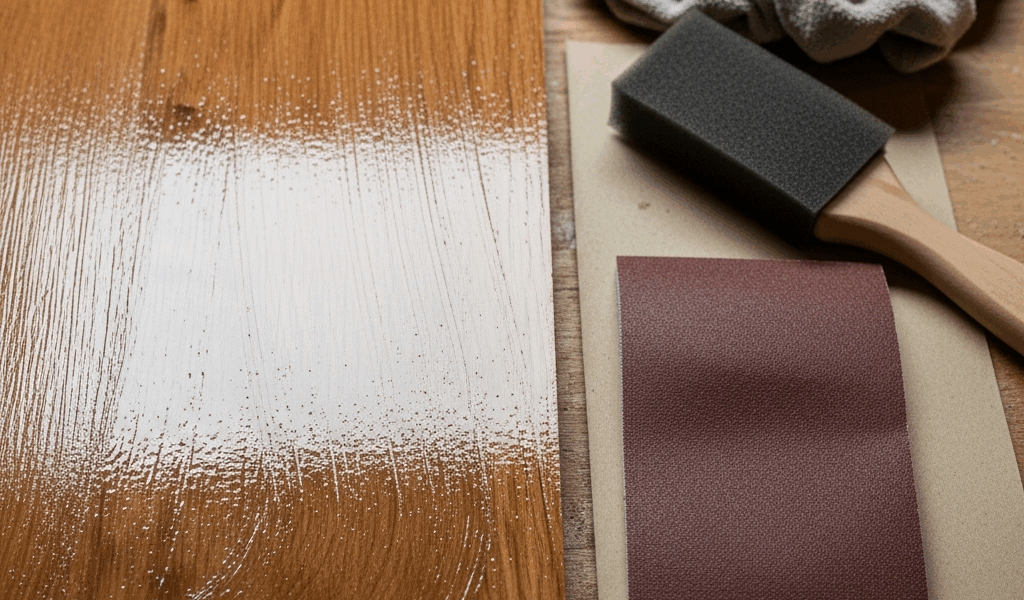
Sanding Out Brush Marks Without Burning Through the Finish
Frustrated by a completely wrecked dresser top back in 2021, I learned the hard way that sanding cured polyurethane is more surgical than sanding bare wood. Different animal entirely.
Start with 220-grit for initial flattening. Coarse enough to cut the peaks without taking forever, fine enough that you won’t blow through to bare wood on the edges. Use a sanding block — a proper cork or rubber one, not a folded piece of sandpaper — on flat panels. The block keeps pressure even. A random orbital sander creates dips and hollows you won’t notice until the next coat goes on. Yes, the block takes longer. It also keeps your finish alive.
Sand with the grain. Light pressure. Let the paper work. You’re leveling the tops of ridges, not removing the whole coat. On a standard 2×4-foot panel, expect 15–20 minutes depending on how deep the damage runs.
After 220, switch to 320-grit. This stage removes the scratch pattern left behind and preps the surface for a new coat. Another fifteen minutes, same block, same easy pressure. Watch your dust — fine and pale, almost powdery, means you’re good. Chunky or dark means you’re pressing too hard. Back off.
Two warnings worth repeating: random orbital sanders on thin finish coats will create swirl marks and can burn through faster than you’d believe. And edges and corners — the finish is always thinner there. Sand those last, check constantly. One careless second and you’re at raw wood. You’ll know immediately once any stain or finish goes over it.
Wipe everything with a tack cloth when you’re done. The slightly sticky fabric kind — not paper towels, not a rag. Residual grit in the surface will roughen your new coat and undo everything you just spent an hour doing.
Recoating After Sanding So You Do Not Repeat the Problem
Most people sand the marks out perfectly, then create brand new ones on the recoat. That’s a demoralizing loop to be stuck in. So let’s talk about what actually changes on the application side.
Brush choice matters here — more than most people admit. Oil-based polyurethane flows better with natural bristle brushes. Hog hair, typically. Synthetic bristles work fine on water-based poly but drag on oil-based and leave tracks. A 2-inch Purdy brush with natural bristles runs somewhere around $14–18 at most hardware stores. I’m apparently a Purdy person — that brush works for me while cheap house-brand alternatives never quite do. One brush, multiple projects. Don’t cheap out here.
Thin your first recoat by roughly 10%. Mineral spirits for oil-based poly, water for water-based. This improves flow-out — the finish levels itself more naturally because viscosity drops. I know it sounds backward. It works. The finish still cures to full hardness; you’re just giving it time to flatten before the solvents flash off.
Application: lay on a light coat, working in the grain direction. Don’t overbrush. Once the coat is down, use tipping off — very light drag strokes along the grain with almost no pressure — right at the end. That’s the move that actually levels the wet finish. That’s what makes this technique so valuable to woodworkers who’ve fought brush marks for years. Most people skip it or have never heard of it. That’s why the ridges come back.
Control the environment. Shoot for 65–75°F and 40–50% relative humidity. Varathane and Minwax both print recommended conditions right on the can — check them. At 80°F with low humidity, the poly skins over fast and you’re racing the clock from the first stroke. Wait for better conditions if you can. If you can’t, work in smaller sections.
When to Strip It Completely and Start Over
Two full sand-and-recoat cycles and the surface still looks wrong under raking light — shadows, pooling, grain showing through some spots and not others — stripping is actually the faster path forward. Not a failure. The faster path.
Chasing uneven, cloudy, or visibly layered finish with more coats is like patching drywall without priming first. You’re working against physics. Chemical stripper — Citristrip or Strypeeze, roughly $12 per quart at most home centers — removes everything in about four to six hours of work and doesn’t raise the grain the way water-based strippers do. Sand off the softened finish with 150-grit, wipe clean with mineral spirits, start fresh.
This new approach took off for me several years back and eventually evolved into the process woodworkers in finishing forums know and rely on today. Full strip, clean slate, controlled recoat. Yes, it’s a day of work. But you learn more from one clean restart than from five coats of progressively worse finish stacked on top of each other.
Next time around, you’ll control the temperature, thin the poly, use the right brush, and tip off properly. And you’ll end up with a finish that actually looks like you meant to do it that way all along.


Stay in the loop
Get the latest fine finish wood working updates delivered to your inbox.