Hand tool woodworking has gotten complicated with all the gear debates, technique arguments, and “you need this vintage plane” videos flying around. As someone who’s been working wood with hand tools for most of my career — sometimes by choice, sometimes because I couldn’t afford power tools early on — I learned everything there is to know about traditional techniques for modern furniture making. Today, I will share it all with you.
Part 1: Essential Tools and Fundamentals

Hand tool woodworking connects us to centuries of craftsmanship tradition while producing results that are honestly impossible to achieve with power tools alone. I’m not saying this as a hand tool purist — I use machines too — but there are things a sharp plane does that no sander can replicate.
Essential Hand Planes
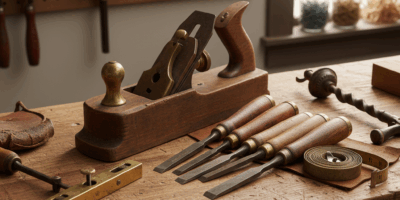
The hand plane remains the most versatile tool in any woodworker’s arsenal. Understanding the different types and their applications enables efficient stock preparation and refined surface finishing. Let me break down what you actually need.
Bench Planes
Bench planes handle the bulk of dimensioning and smoothing work. The jack plane — typically a number 5 or 5-1/2 — excels at initial stock removal. Its moderate length bridges minor surface irregularities while its width covers material efficiently. Set the iron for a more aggressive cut during rough work. This is your workhorse, and it’s where I’d tell any beginner to start.
The jointer plane, numbers 7 or 8, creates flat surfaces and straight edges. Its length references across board surfaces, removing high spots while spanning low areas. It’s essential for edge jointing before glue-ups — the jointer plane produces edges that mate perfectly without gaps. I use mine almost every day in the shop.
Smoothing planes, numbers 3 or 4, produce final surfaces ready for finishing. Set with a fine mouth opening and a sharp iron taking whisper-thin shavings, a well-tuned smoother leaves surfaces that need no sanding whatsoever. The short sole follows surface contours, removing plane tracks from previous operations. There’s nothing quite like the surface a properly tuned smoother produces.
Specialty Planes
Block planes handle end grain and small work where bench planes prove unwieldy. Their low angle bedding and compact size enable precise trimming and fitting. I’d recommend having both a standard and low-angle block plane available — they come in handy more often than you’d expect.
Shoulder planes trim tenon shoulders and rabbets. Their sides are machined square to the sole, which means you can work right into corners. The full-width iron cuts to the edge without leaving any uncut material at corners. These aren’t cheap, but they pay for themselves on your first set of mortise and tenon joints.
Router planes establish consistent depth in dadoes, grooves, and hinge mortises. Despite sharing a name with power routers, hand router planes work slowly and deliberately — which is actually ideal for precise fitting work where you don’t want to overshoot.
Chisels and Their Uses
Chisels pare, chop, and carve wood for joinery and detail work. A basic set of bench chisels in quarter-inch increments from 1/4 to 1 inch handles the vast majority of tasks you’ll encounter. Don’t go overboard buying every size; you can always add specialty widths later.
Chisel Techniques
Paring uses hand pressure alone, guiding the chisel with precise control. Register the flat back against a reference surface when establishing shoulders or cleaning up joinery. Sharp chisels pare end grain cleanly without tearing — if you’re getting tearout, it’s a sharpness problem, not a technique problem.
Chopping uses mallet blows to drive the chisel through wood fibers. Establish vertical walls by chopping straight down, then remove waste by cutting horizontally toward the first cut. Work from both sides toward the middle on through mortises. I’ve cut hundreds of mortises this way, and it becomes almost meditative once you’ve got the rhythm down.
Saws for Joinery
Western-style backsaws make precise joinery cuts. The stiff brass or steel back prevents blade deflection, enabling straight cuts that require minimal cleanup afterward.
Tenon Saws
Tenon saws cut the cheeks and shoulders of tenons, as the name suggests. Rip-filed teeth cut efficiently with the grain on cheek cuts. A 14 to 16 point crosscut saw handles shoulder cuts cleanly. I keep both filed up and ready to go at all times.
Dovetail Saws
Smaller dovetail saws cut the pins and tails of dovetail joints. Their thin kerf and fine teeth enable the precision these joints demand. Many woodworkers — myself included, actually — prefer Japanese-style pull saws for dovetail work. The pull stroke gives you better control, at least in my experience.
Sharpening Fundamentals
Probably should have led with this section, honestly. Sharp tools define hand tool woodworking success. Dull tools require excessive force, produce poor results, and create dangerous working conditions. Establishing a regular sharpening routine keeps tools performing at their best, and it’s something I do at the start of almost every shop session.
Sharpening Media
Waterstones sharpen quickly and produce very keen edges. Synthetic stones offer consistent grits while natural stones provide character and exceptional final edges. Soak stones before use and flatten them regularly to maintain flat surfaces — a warped stone produces warped edges, which defeats the whole purpose.
Diamond plates require no flattening and cut quickly. They’re excellent at establishing primary bevels and refreshing damaged edges. Use them with water for lubrication and swarf removal. I use diamond plates for the rough work and waterstones for the final honing.
Sharpening Technique
Flatten the back of new tools before sharpening the bevel. This flat reference surface determines edge geometry — if the back isn’t flat, the edge won’t be right no matter how carefully you hone the bevel. Work through progressively finer grits until the back reflects light uniformly.
Establish the primary bevel at 25 degrees for most bench plane irons and chisels. A secondary micro-bevel at 30-35 degrees creates the actual cutting edge and speeds up routine honing considerably. Only the micro-bevel requires regular attention, which means each sharpening session takes just a couple minutes instead of ten.
Workholding Solutions
Secure workholding enables effective hand tool use. The workbench with its vises and dogs forms the foundation of hand tool work — and honestly, I’d say the bench is the most important “tool” in the shop.
Vises
A face vise at the front left corner holds boards for edge work. The quick-release mechanism speeds things up when you’re frequently clamping and releasing. Wooden jaw liners protect workpieces from metal-induced dents, which is a lesson I learned the hard way on a nice piece of cherry.
The tail vise or wagon vise works with bench dogs for face clamping. This system secures boards flat on the bench surface for planing, routing, and carving. Holdfasts supplement this system for irregularly shaped pieces — they’re simple, fast, and incredibly effective.
Part 2: Advanced Techniques

Mastering Difficult Grain
Figured wood — curly maple, quilted mahogany, birdseye — presents challenges that separate competent woodworkers from masters. The interlocking grain that creates all that visual beauty also causes tearout when planed carelessly. Ask me how I know.
Reading Grain Direction
Before cutting, examine the board’s edge. Grain lines angling upward indicate the direction to plane. Think of it like petting a cat from head to tail rather than against the fur — planing with the grain lifts fibers gently rather than catching and tearing them.
Problem areas often reveal themselves as tearout on one pass. Mark these zones and reverse direction, or approach from the opposite end. Complex figure may require planing from multiple directions, meeting in the middle. It’s a dance, and you get better at reading the wood over time.
Adjusting Technique
Reduce cutting depth dramatically when approaching difficult grain. Take shavings so thin they’re translucent — I’m talking see-through. Close the plane’s mouth opening to support fibers directly ahead of the cutting edge. A back-bevel of 5-10 degrees on the iron increases the effective cutting angle, further reducing tearout.
That’s what makes hand tool woodworking endearing to us who practice it — the problem-solving is constant and deeply satisfying. Scrapers excel where planes struggle. The cabinet scraper produces fine shavings with a nearly vertical cutting action that rarely tears even the most challenging figure. Master scraper sharpening to access this invaluable technique.
Complex Joinery
Through Dovetails
The through dovetail joint represents traditional joinery at its finest. Visible from both faces, this joint advertises the maker’s skill while providing exceptional mechanical strength. There’s a reason they show up on so many high-end pieces.
Mark pins from tails for gap-free joints. Cut tails first, sawing slightly outside the marked lines. Pair the finished tails against the pin board and scribe directly from the cut surfaces. This transfer method accounts for any deviation from perfect saw cuts — which is how real joints get made, not by relying on measurements alone.
Mortise and Tenon Variations
Beyond basic mortise and tenon, advanced variations solve specific structural challenges. The haunched tenon fills the groove at a frame’s top while providing resistance to racking. The tusk tenon — with its exposed wedged end — allows knockdown furniture construction, which was clever design centuries before IKEA made flat-packing a thing.
Drawboring pulls joints tight mechanically. Offset the peg hole in the tenon slightly toward the shoulder. When the tapered drawbore pin enters, it pulls the tenon deeper into the mortise, creating a self-tightening joint that requires no glue. I’ve seen drawbored joints on furniture that’s still tight after two hundred years.
Stock Preparation by Hand
From Rough to Flat
Processing rough lumber entirely by hand connects you directly to the material while developing skills you can’t get any other way. Begin with winding sticks to identify twist. These matched sticks placed at each end of a board reveal any deviation from flat as a visible gap between their top edges.
Remove twist first with a scrub plane or aggressively set jack plane. Work diagonally across the grain, removing high spots indicated by the winding sticks. Check progress frequently — I can’t stress this enough. Removing too much material creates new problems that are harder to fix than the original ones.
Once twist is eliminated, flatten the face using the jointer plane. Long, overlapping strokes reference the plane’s sole against previously flattened areas. Mark high spots with chalk if it helps, then plane until chalk disappears uniformly across the whole surface.
Thicknessing and Squaring
With one face flat, gauge the desired thickness and plane the opposite face parallel. A marking gauge leaves a clear line around the board’s edges — plane to this line, checking with a straightedge across the face to maintain flatness.
Joint one edge using the jointer plane registered against the flat face. Check for square with a reliable square. Finally, gauge and plane to width, completing the four-square stock preparation process. It’s methodical, it takes time, and it produces results that are absolutely worth the effort.
Final Thoughts
Hand tool woodworking rewards patience and practice with results unmatched by any other method. Start with quality tools, learn proper techniques, and develop your skills through consistent practice. The quiet satisfaction of hand tool work — no ear protection needed, no dust collector roaring — awaits those willing to invest the effort. Once you’ve experienced it, you’ll understand why so many of us keep coming back to the hand tool bench.


Stay in the loop
Get the latest fine finish wood working updates delivered to your inbox.