Why Stain Goes Uneven After It Dries
Wood staining has gotten messy with all the conflicting advice flying around. Sand this grit, use that conditioner, wipe at exactly this minute — and somehow you still end up staring at a tabletop that looks like a relief map of the Appalachians.
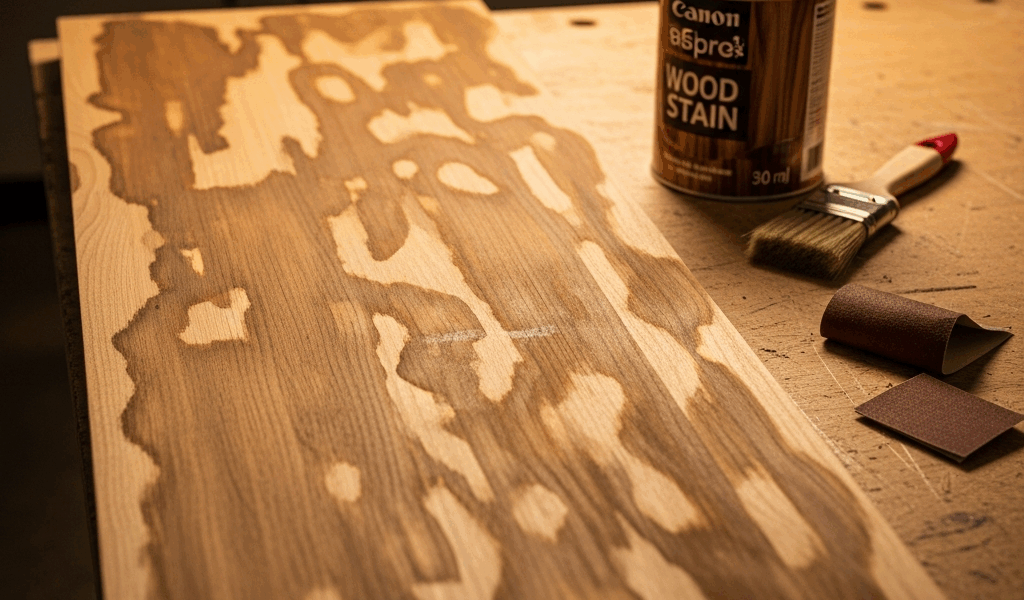
I’ve been there. Six o’clock on a Saturday, workshop lights humming, and the piece I’d spent two hours on looked genuinely terrible. Dark patches near the ends, pale streaks across the middle, one corner nearly black. As someone who has destroyed more than a few projects chasing shortcuts, I eventually learned what actually goes wrong — and how to fix it without starting over every single time. Today, I’ll share it all with you.
Three things cause uneven stain. Inconsistent sanding — switching from 80-grit to 120-grit mid-project, or skipping the 150-grit final pass — leaves scratch patterns that drink pigment at different rates. Deeper scratches pull in more color. Residue is the second culprit: dust, old finish particles, even dried sweat from your hands creates a barrier. Stain can’t penetrate evenly through that. Third is timing. Leave excess stain sitting too long and it pools in low spots, going dark. Wipe too early and you pull the color right off.
The good news? You don’t always need to strip the whole thing. But you do need to actually diagnose what went wrong before you touch it again.
Assess the Damage Before You Do Anything
Step away from the piece. Literally walk away for ten minutes — go make coffee, do something else. Then come back and look at it in natural light. Shop lights flatten everything and lie to you about color variation. A window works better than any artificial bulb.
Now ask yourself three questions:
- Is the unevenness subtle? Slight tonal variation, nothing that jumps out until you tilt the wood under a lamp. Barely noticeable from arm’s length.
- Are there obvious patches? Clear dark and light zones. Blotchy. Someone picking up the piece cold would notice immediately.
- Is it a total disaster? Streaks, pooled pigment, bare spots, or sections so dark they’re nearly black while neighboring areas are barely tinted.
Light variation? Fix 1 handles that. Obvious patches? Fix 2. Total wreck? Strip it and start clean — that’s Fix 3.
One more thing before you pick a fix: what stain did you actually use? Oil-based stain stays workable for 8–12 hours before it fully hardens. Water-based locks in mistakes fast — usually within 1–2 hours. If you used oil-based, your correction window is wider. Water-based means a simple wipe-down probably won’t help at this point. Knowing which one you’re dealing with changes everything about your next move.
Fix 1 — Blend It With a Second Coat or Toner
This fix is for mild unevenness only. The goal is a second, thinner application that evens out tone without darkening the whole piece so much you’ve just traded one problem for another.
Start with light scuffing. 220-grit sandpaper — nothing coarser — hand-sanded across the entire surface. You’re not removing the old stain. You’re just roughing the surface enough that fresh stain will grab. Light pressure. Two or three passes per section. You should barely see dust. Clouds of dust mean you’re pressing too hard.
Wipe everything down with a tack cloth. Let it sit five minutes.
Now the decision: diluted stain or gel stain? If you have leftover stain from the original coat, thin it — mineral spirits for oil-based, water for water-based. Roughly 75% stain to 25% solvent. Apply a thin coat with a foam brush or lint-free cloth, working with the grain. This time, wipe after 2–3 minutes instead of 10. You want subtle tone correction, not a second full coat.
No leftover stain? Gel stain might be the best option here, as blending requires more working time. That’s because gel sits on the surface slightly longer and gives you better control. Apply it sparingly — 2–3 minute wipe time, same as above.
The real risk with Fix 1 is that you darken the whole piece. It’ll look richer, sure, but the blotchy variation might still be visible underneath. Go thin. Two light passes will always beat one heavy one.
This is the piece to know up front — timing is everything on the second coat. Don’t assess until each layer has fully cured. Oil-based needs a full 24 hours. Water-based needs 6–8 hours minimum.
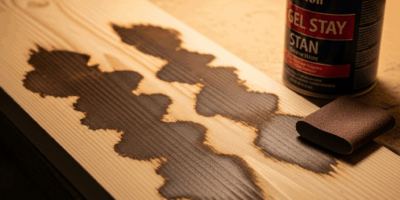
Fix 2 — Spot Sand and Re-Stain the Affected Areas
When the damage is localized — one corner dramatically darker, a stripe where your brush overlapped — this is the fix. You’re taking just the bad zone back to bare wood and re-staining it to match the rest.
Mark the problem area with a pencil if it helps you stay oriented. Then sand that zone back to raw wood — 80-grit or 100-grit, actual removal, not scuffing. Sand until you see natural wood color again.
Here’s where most people make it worse: the feathering. Create a hard edge between bare and stained wood and you’ll see a line — a visible, impossible-to-ignore line that catches every angle of light. Instead, work outward from the damaged zone gradually. Heavy pressure at the center, easing off as you move out. Feather across 2–3 inches in each direction depending on the blotch size. You’re building a slope, not digging a cliff.
Follow the feathered zone with 150-grit to smooth the transition. Wipe everything with a tack cloth. Wait five minutes.
If the surrounding stain is dark, or if you’re working with water-based stain — which raises grain on freshly sanded wood — pre-condition the bare area first. Minwax Pre-Stain Wood Conditioner works well here. Apply it, wait 15 minutes, wipe the excess. This keeps the fresh bare wood from pulling stain darker than the section around it.
Apply stain to the bare and feathered zone. Matching the surrounding color is genuinely tricky — fresh stain often looks lighter than dried stain until it fully cures. Test on scrap if you have any sitting around. Don’t repeat what I did of eyeballing it wet and assuming it’ll match. Standard wipe time for your brand — usually 5–10 minutes — then wipe with a cloth, not a brush. A cloth blends cleaner.
Let it cure fully before judging results. Under direct raking light, you may still see a faint transition. From normal viewing distance? It should disappear.
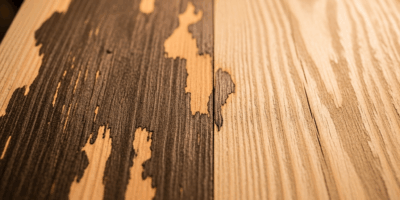
Fix 3 — Strip It and Start Clean
If Fix 1 and Fix 2 won’t cut it — if the damage is severe, or you’ve already tried one of the above and made things worse — stripping is honest work. Time-intensive, yes. But honest.
Two routes. Chemical stripper like Klean-Strip or Citristrip is faster, messier, and requires ventilation and gloves — the orange Citristrip is lower-odor if you’re working indoors. Sanding is slower and generates serious dust but leaves you with cleaner, more consistent bare wood. I’m apparently a sanding person, and a Makita random-orbit sander works for me while chemical strippers never give me the clean result I’m after. Either way, you’re going back to raw wood.
For complete stripping guidance and how to prep properly so you don’t end up back here a second time, the full walkthrough lives in our guide on avoiding blotchy wood stain. The short version: 150-grit final pass across the entire surface, wood conditioner applied and wiped before any stain touches the wood, and slower application with careful wipe timing.
One last thing worth saying out loud: blotchy stain almost always comes from rushed prep — not from the stain itself. That’s what makes wood finishing so frustrating to us beginners. The actual staining step takes twenty minutes. The prep that determines whether it works takes two hours. Don’t skip it. The difference between a result you’re proud of and another Saturday evening of regret is almost always those two hours you talked yourself out of.

Stay in the loop
Get the latest fine finish wood working updates delivered to your inbox.