The $12 Insurance Policy

You’ve spent weeks building a project. The wood cost $300. The hardware cost another $75. You’ve invested forty hours of careful work. Now you’re ready to apply stain, and everything hangs on this moment.
Without pre-stain conditioner, you’re gambling. Blotching, uneven color, visible sanding marks that only appear under stain—any of these can transform your careful work into a disappointment. The solution sits on the shelf at every hardware store: pre-stain wood conditioner, typically around $12 for a quart that treats numerous projects.
This small investment protects everything you’ve already put into your work.
What Pre-Stain Conditioner Actually Does
Wood isn’t uniform. Even within a single board, density varies. End grain absorbs faster than face grain. Soft areas drink stain while dense areas resist it. These variations create blotchy, uneven results when stain hits unprepared wood.
Pre-stain conditioner is essentially thinned finish that partially seals the wood before staining. It penetrates deeply into porous areas while coating denser areas more lightly. This evens out absorption rates across the surface.
When you apply stain afterward, every part of the wood accepts color more uniformly. The porous areas can’t drink excessive stain because they’re partially sealed. The dense areas accept more color because they’re not competing against neighboring sponge-like zones.
Which Woods Need It Most

Absolutely essential: Pine, fir, spruce, poplar, aspen, alder—any soft, blotch-prone species. These woods cannot be stained attractively without pre-treatment.
Strongly recommended: Cherry, birch, maple—hardwoods with variable density that routinely blotch. Cherry especially benefits; its beautiful figure becomes a liability when stain reveals hidden density patterns.
Usually not needed: Oak, ash, walnut, mahogany—woods with consistent density and open pores that accept stain evenly. Though conditioner won’t hurt these species if you’re uncertain.
Proper Application Technique
Surface preparation: Sand to your final grit before conditioning. Conditioner locks in the current surface—any sanding marks present will become more visible, not less, once stain is applied.
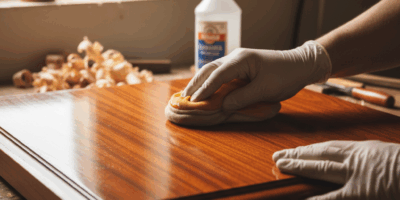
Application: Brush or wipe conditioner liberally across the entire surface. Work in manageable sections but maintain wet edges. Coverage should be thorough and even.
Wait time: Most conditioners specify 5-15 minutes. This is when penetration occurs. Setting a timer prevents forgetting and allows the product to work properly.
Wipe off excess: After the specified time, wipe the surface thoroughly with clean rags. Any conditioner remaining on the surface can interfere with stain adhesion and create cloudy patches.
Stain timing: Apply stain within the conditioner’s working window—typically 30 minutes to 2 hours depending on brand. If you wait too long, the conditioner cures completely and blocks stain penetration entirely.
The Hidden Benefit: Revealing Defects

Conditioner shows you what stain will show you—before the stain. Surface scratches, glue residue, areas of uneven sanding, all become visible when conditioner wets the wood. This gives you a chance to address problems while correction is still possible.
I’ve caught glue spots, missed sanding marks, and surface contamination during conditioner application many times. Each discovery saved a project. Once stain is applied, these defects become permanent.
Compatibility Considerations
Match your conditioner to your stain. Oil-based conditioner works with oil-based stain. Water-based conditioner works with water-based stain. Using mismatched products can cause adhesion problems, uneven color, or cloudy finishes.
Most major brands (Minwax, Varathane, General Finishes) offer matching conditioner-stain systems. Stay within the same product line for guaranteed compatibility.
When Not to Use Conditioner
Gel stains don’t require conditioner. Their thick consistency prevents penetration, making density variation irrelevant. If you’re using gel stain specifically to control blotching, conditioner becomes redundant.
Dye stains penetrate based on chemistry rather than porosity. Conditioner can actually block dye penetration and reduce color intensity. Test dye-conditioner combinations on scrap before committing.
Clear finishes without stain don’t benefit from conditioner. If you’re applying oil, polyurethane, or lacquer without color, skip the conditioner—it adds nothing while potentially interfering with adhesion.
The Test Piece Rule
Always condition and stain a test piece first. Use actual offcuts from your project, prepared identically to your finished parts. The test reveals exactly how the conditioner-stain combination will perform on your specific wood.
Keep test pieces after your project is complete. They become reference samples for future work with similar materials. After years of saving test pieces, you’ll have a library showing exactly what works on different woods.
Protecting Your Investment
Twelve dollars for a quart of conditioner. Compared to weeks of work, hundreds in materials, and the emotional investment in your creation, it’s not even a question. Conditioner is cheap insurance against visible disappointment.
Make it automatic: whenever you buy stain, buy matching conditioner. Apply it whenever you’re uncertain whether your wood needs it. The small effort and minimal cost protect everything else you’ve invested.


Stay in the loop
Get the latest fine finish wood working updates delivered to your inbox.