Why Polyurethane Peels in the First Place
Polyurethane finishing has evolved with all the conflicting advice flying around. As someone who has watched an entire tabletop finish bubble and peel off in sheets after what looked like a perfect application, I spent real time learning the ins and outs of why this stuff fails. Today, I will share it all with you.
Here’s the thing — polyurethane doesn’t fail randomly. It peels because something broke the bond between coats, or between the finish and the wood itself. That distinction matters more than most people realize.
The most common culprit? Oil or silicone contamination. You sand the surface, wipe it down, think you’ve got a clean substrate. You don’t. Residual furniture polish, shop dust settled in an oil film, even fingerprints — skin oils create a slick barrier that polyurethane flatly refuses to grip. I once ruined a perfectly good dresser by reaching for a citrus-scented cleaner instead of naphtha. Smelled harmless. Finish was destroyed within three weeks.
But what is an incompatible sealer problem? In essence, it’s a mechanical mismatch between finish layers. But it’s much more than that. Water-based poly over a glossy lacquer sealant, or oil-based poly over a water-based primer — these combinations don’t fuse at the molecular level. They sit on top of each other like wet plastic wrap on glass. You won’t know it failed until the peeling starts.
Third cause: recoating outside the window. Oil-based polyurethane has a sweet spot — usually 12 to 24 hours after the previous coat. Wait too long and the surface hardens into a fully cured membrane that new poly can’t bite into. Apply the next coat in the first two hours and the solvents haven’t flashed off yet. Adhesion fails either way. The window is real and unforgiving.
How to Tell If You Can Spot-Repair or Need to Strip
Quick note before the rest of this. Before you sand anything, you need to know whether you’re looking at a salvageable local failure or a systemic problem that demands total removal.
Run the tape test first. Press a piece of standard painter’s tape — the blue 3M stuff works fine — firmly onto the peeling area, then yank it off hard. If the finish lifts with the tape, you’re dealing with adhesion failure across a wider zone than you can see. That’s a strip-and-redo situation, full stop. If the finish stays put and only the already-loose peel comes away, you can probably save the piece.
Next, measure the affected area. Peeling smaller than your palm? Spot repair works. Peeling across multiple square feet, or running in a line down the middle of a tabletop? The adhesion failure is either systematic or caused by wood movement — both are reasons to strip. No exceptions.
Look at the exposed layer underneath the peel. Bare wood means the first coat failed to bond to the substrate itself. That demands full removal. Bare first coat visible — you’ll notice a different sheen level, usually slightly more matte — means the second or third coat let go. That’s repairable.
One final question worth asking yourself: is this peeling isolated, or is it happening in multiple spots across the piece? Multiple spots signal widespread contamination or a timing problem. One clean bubble or edge lift? Spot repair is worth your time. That’s what makes this diagnostic process so valuable to us woodworkers — it saves you from tearing apart a piece that only needs minor surgery.
How to Fix Peeling Polyurethane With a Spot Repair
So, without further ado, let’s dive in. Once you’ve confirmed the peel is local and the surrounding finish is properly bonded, grab a sanding block, some 220-grit paper, and naphtha. Actual VM&P Naphtha — not mineral spirits, not paint thinner. This matters. The repair is slower and more deliberate than it looks.
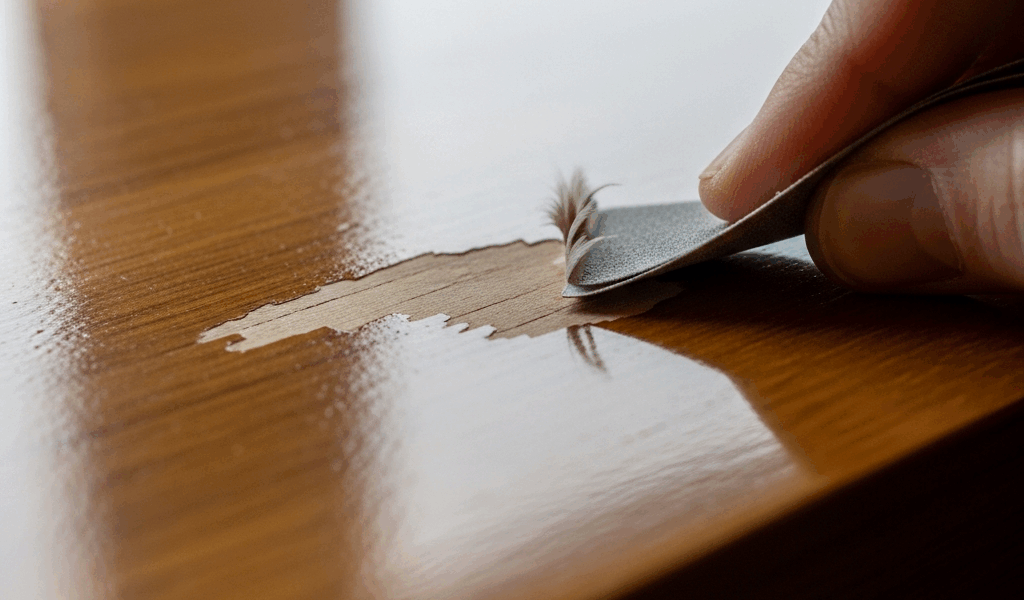
- Carefully lift the peeling edge. Use a plastic scraper or an old credit card to gently pry up the loose finish. Don’t force it. You’re finding the perimeter of the fail zone, not excavating a trench. Go slow.
- Feather-sand the edges of the lifted area. This is the critical move that most guides skip entirely. Using 220-grit wrapped around a hard sanding block, sand the edge of the peel at roughly a 45-degree angle — working from the lifted finish down toward the substrate. The goal is a gradual transition, not a cliff edge. Two to three minutes per square inch. Long, angled strokes, never circular. You’re tapering the existing finish, not pulverizing it.
- Clean with naphtha — not mineral spirits, not thinners. Naphtha evaporates faster and leaves less residue. Dampen a lint-free cloth and wipe the entire repair zone, including two inches beyond the peel on all sides. Let it dry for five minutes. The smell will be sharp and chemical. That’s correct. If it smells mild, your naphtha is old or diluted.
- Scuff the surrounding finish. Using 320-grit paper and light pressure, scuff a four-inch radius around the repair. You’re not removing anything — you’re breaking the gloss so new poly has mechanical teeth to grip. Thirty seconds of sanding is usually enough. Wipe away dust with a damp cloth, then let dry completely.
- Apply thin coats — thinner than you think necessary. Avoid the path I took. I tried filling the void in one thick pass. The finish sagged, cured unevenly, and peeled again inside a month. Thin coats instead: 1/32-inch maximum per application, using a quality foam brush. Brush in the direction of the wood grain. Apply two light coats, waiting 2 to 4 hours between them — though honestly, check the specific can you’re using. Minwax and Varathane both print different windows.
- Blend the transition. Once the final coat has cured fully — overnight minimum, longer in humid weather — gently scuff the entire repair area with 320-grit, then 400-grit paper. This removes brush marks and blurs the boundary between old finish and new. Wipe clean. If the sheen doesn’t match, apply one final thinned coat of gloss or satin poly across the whole surface. Small price to pay for avoiding a full strip.
Frustrated by a failed first attempt on my own 36-inch farmhouse table, I rebuilt that finish using three thin coats and about six hours of actual work spread across three days. The finish looks invisible now. The table is eight years old. That was 2016 and it hasn’t peeled since.
How to Avoid Peeling on the Next Coat
Prevention saves weeks of work. These are the non-negotiable steps I follow before every single coat — I’m apparently obsessive about the naphtha wipe and Varathane works for me while cheaper store-brand poly never bonds properly on my oak pieces.
Respect the recoat window. Oil-based polyurethane: 12 to 24 hours between coats. Not 8. Not 36. Water-based poly: 3 to 6 hours. Read the actual label on your specific can. These timelines exist because they represent the adhesion sweet spot — not a manufacturer suggestion, a chemistry reality.
Degrease everything. Before coat two, wipe with a naphtha-dampened cloth. Before coat three, do it again. Skin oils accumulate from handling the piece. They’re invisible. They’re deadly to adhesion.
Sand between every coat. 320-grit, light pressure, two minutes per square foot. You’re killing gloss, not removing material. Then tack-wipe with a lint-free cloth dampened — not wet — with naphtha. Let it flash off for five minutes before picking up a brush.
Run the tape test before committing to the next coat. Press tape on your last cured coat, pull hard. If it lifts, your surface isn’t ready. Re-degrease and try again in 24 hours. That’s what makes this step so critical — it catches problems before they become a full refinishing job.
When You Actually Do Have to Strip and Start Over
If the peeling extends across more than 20 percent of the surface, reaches bare wood in multiple locations, or lifts under the tape test across the whole piece — stripping is unavoidable. It’s brutal. It’s absolutely worth it.
Don’t limp through a patch-and-pray strategy on a widespread failure. You’ll spend forty hours on spot repairs and still end up with a piece that fails again inside a year. Strip it. Start clean. The finish you put on after a proper strip will outlast anything you try to salvage over a compromised base.

Stay in the loop
Get the latest fine finish wood working updates delivered to your inbox.